

Click to Teach/Click to Learn: Verbatim Theatre
This Click to Teach is based on the lesson "Verbatim Theatre: Telling Real Stories Onstage" by theatre educator Joel King. The full lesson may be found in the SEL Lesson Plan Library. (use the 'search this list" function and put "verbatim" in the keyword.)
In this unit of instruction, students will learn to create and perform verbatim/documentary style theatre. This lesson is best suited for High School Proficient level. Note: Though it is not required, students will benefit from a working knowledge of structure and conventions of script writing and performance techniques including body centers, body language, and vocal dynamics (pitch, rhythm, tempo, tone, and silence.). The steps should take 7-15 class sessions.
Students will be able to:
- Identify and understand key concepts used for creating verbatim theatre performances
- Create a verbatim theatre script
- Perform original verbatim theatre piece
Step 1: Get Inspired
Watch this short video of a performance by Anna Deveare Smith from her play Twilight Los Angeles: 1992.
Reflect:
1. This is an example of Verbatim Theatre, based on what you saw happening, what do you think Verbatim Theatre is?
2. What do you think is the topic of this play?
3. What is your overall impression or reaction to what you saw? What stands out to you about her portrayal of the characters?
Step 2: Introduction to Verbatim Theatre
According to the Merriam-Webster dictionary, the word "verbatim" is defined as "in the exact words" or "word for word". In verbatim theatre, the script is comprised of quotes from real people.
"Verbatim theatre is a form of documentary theatre which is based on the spoken words of real people. Strictly, verbatim theatre-makers use real people’s words exclusively, and take this testimony from recorded interviews. Documentary theatre by contrast encompasses other found sources such as newspaper articles and diaries." (source: Dr. Tom Cantrell, University of York).
Watch the video below by the National Theatre to learn more about Verbatim Theatre.
After you are done watching, complete the "Verbatim Theatre Intro Activity". Download and print out a copy or open the document in another window and be prepared to discuss and share your responses OR your teacher may ask you to write your responses in your journal.
Step 3: Choose a Topic
For this project, you will be choosing a topic that interests you and interviewing someone who has a story/experience to share regarding this topic. Then you will take a section of their interview and perform it as a verbatim theatre monologue.
When creating Verbatim Theatre, it's best to start with a topic/issue/event/area of interest that you would like your piece to touch on. Verbatim theatre provides the opportunity to give a voice to the voiceless or highlight issues that might not usually be in the spotlight. Take a moment and think about some topics that resonate with you that you may want to focus on. Use the following questions to guide your thinking:
- What’s in the news?
- What’s on social media?
- What do you experience in your everyday life?
- What is your deepest passion?
- What is your biggest fear right now?
Once you have done some reflection, choose a topic that you would like to focus on for your verbatim theatre piece. Conduct some initial research on this topic to become more familiar with it. Think about who might have a story or experience that they can share related to your topic and who you might want to interview for your piece.
Step 4: Create Interview Questions

To create a verbatim theatre piece, you may find it helpful to have some leading questions to guide your interview and help get the conversation started. These questions should be open-ended questions which require an explanation and cannot be answered with just “yes” or “no”. Asking open-ended questions will lead to richer and fuller answers that you can pull quotes from for your piece.
An example of an open-ended leading question is below:
Topic – COVID Lockdown
Question – How has the COVID lockdown impacted your life?
Create 3 leading questions that could get a discussion started OR could lead to a story from your interview subject. Create at least 2 follow up open-ended questions for each of these leading questions that you could ask interviewees to get more information/details.
NOTE: During the interview, it is important to be flexible and willing to change your questions based on where the interview leads you. But going into the interview with a list of questions will help you be prepared and have a successful interview.
Step 5: Prepare and Schedule
As you move into the part of the process where you are planning your interview, it is important to think about the ethics behind interviewing someone and using their exact words for a theatre piece. One of the most important parts of this process is being honest with the person that you are interviewing and clearly communicating to them that you would like to interview them and that their words will be used to create a piece of theatre. Ask the person you are interviewing if you can record the interview, and get their permission to use their words for this project.
Watch the video below to hear more from some theatre-makers about the ethics of verbatim theatre.
Here is a list of Interview Guidelines to keep in mind:
- Schedule a specific time and place to meet with your interviewee
- Choose a non-distracting environment to conduct the interview
- Make sure you have a working recording device ready and/or a plan in place for how you will record the interview (if they give you permission to record)
- Make sure you have something to take notes with during the interview
- Get permission to record (video if possible)
- Take notes about their physical appearance, body language, and gestures
- Focus on the interview…don’t multi-task
- Ask your leading question and let them talk
- Have your follow up questions ready but be flexible - if they say something that inspires an impromptu follow-up question, feel free to go with it
Schedule and conduct your interview with your chosen interviewee.
Step 6: Transcribing the Interview
Now that you've conducted your interview, it's time to transcribe it. What is transcribing? How is it different from writing an original script? Watch the video below to learn more and see an example of how to transcribe an interview.
To start off, listen to your recorded interview. Find a segment approximately 1-2 minutes in length to focus on. Make sure the segment has a logical flow and is easy to understand. You can edit the interview as long as you don’t change the words. Editing in this case means you can cut out intentionally selected segments of the interview. Make sure your interview subject is okay with the edits. Refer to this "Transcribing Verbatim Interview" document for the full process of this step.
Submit your transcript with an audio/video file or link to your interview to your instructor.
Step 7: Annotations
Once you have the interview transcribed, it will be helpful to add some annotations to it to help you perform it as truthfully as possible. You may choose to use hand-written annotations on a printed version of your transcript, or you could annotate digitally using the notes or comments function on Google docs. Some suggested annotation methods are below:
- Vocal annotations: Using a pencil and highlighters, highlight words or phrases that are spoken with specific vocal dynamics (pitch, tone, rhythm, and tempo). Consider using multiple highlighters and create a color-coded system that will be easy to follow when rehearsing. Silence/pauses can be indicated with a single slash ( / ) for a short pause or a double slash ( // ) for long pauses. When a word or phrase is highlighted, make a specific comment or note about how the vocal dynamic will be applied. For example: a word may be highlighted YELLOW for varied tempo. In the margin, the note might read: "Slow down the pace” or “Spit out the words like a firehose.”
- Physical annotations: Make notes about the body language, facial expressions, gestures, and other movements in the margins and draw arrows to the corresponding moment that physicality occurs. You may find it helpful to circle specific words and phrases.
Step 8: Rehearsal Time
Now that you have a transcript for your verbatim theatre monologue, it's time to start rehearsing your performance. Take a moment to go back to the video in the “Get Inspired” section of this lesson. How did the actress use props, physicality and vocal dynamics to create her characters?
Before jumping into rehearsal, you may want to start off with some vocal and physical warm ups. (If you would like a guided warm-up, here is one option from The National Theatre.)
Read through your transcript a couple of times to yourself. Try to envision the interview as you read it. Think about how you might be able to embody this person. NOTE: For this step, it is helpful to have a printed version of your transcript to rehearse with if possible.
Now, read it out loud once, and try to focus on how they use tempo and rhythm. When do they speed up and when do they pause?
Then, do another read through out loud and focus on how they use pitch and tone. When do they lift the words and when do they drop them?
If you need to, go back and listen to the recording again and make more detailed notes and annotations on your transcript to capture how they use tempo, rhythm, pitch and tone.
Step 9: Refine the Character
Check out this actor's verbatim theatre monologue performance. As you watch the video recording of the interview and the actor's performance, think about the ways that the actor portrays the character. Reflect on the following two questions:
- What moments could you really see the character?
- What moments can they work on to embody the character more?
After you have rehearsed your own performance a few times, it may be helpful to video record yourself to reflect your progress, or get some feedback from someone else. If you record yourself, then after you watch the recording reflect on those same two questions. If you perform the monologue in front a classmate, friend, or family member, ask them to answer those two questions:
- What moments could you really see the character?
- What moments can you work on to embody the character more?
Based on your self-reflection or feedback from someone else, continue rehearsing the piece and working on the character.
NOTE: You will also want to have the transcript memorized so that your final performance can be off-book, so continue to work on memorizing the piece as you rehearse.
Step 10: Technical Elements
The focus of your performance should be a truthful portrayal of the person you interviewed. In order to accomplish this, it may be helpful to add a few small technical elements to help recreate and portray your character.
- Consider finding a costume/costume piece that helps portray the character
- Consider finding a prop that might add detail to the performance
- Think about how you might create an environment for the performance, or find a background image that you can use as a virtual background
Be sure to rehearse with each of these technical elements to see how they feel. How does it feel to incorporate costumes/props? Did they enhance your performance in rehearsals or detract from it? How?
Step 11: Record and Reflect
When you are ready, record a video of your verbatim theatre monologue performance. Submit the video file to your instructor.
After you are done recording your video, watch your performance and write a reflection that addresses the following:
- What successes did you have in embodying your character?
- What was the most difficult part of this project? Why?
- What techniques or concepts can you use to enhance your future performances?
Diving Deeper
Click the image below to read an article in dramatics.org about a documentary theatre piece created by Thespians from Herbert Hoover High School called The Corona Monologues. To create this performance, "students interviewed 40 people in their Glendale, California, neighborhood about the impact of the COVID-19 pandemic on their lives, then reinterpreted the material as a series of monologues focused on enduring human connection." (Martin. "The Corona Monologues." dramatics.org).

Measuring Learning
Here is a link to the Verbatim Theatre Peer Response sheet, download and print out a copy or open the document in another window and be prepared to discuss and share your responses OR your teacher may ask you to write your responses in your journal.
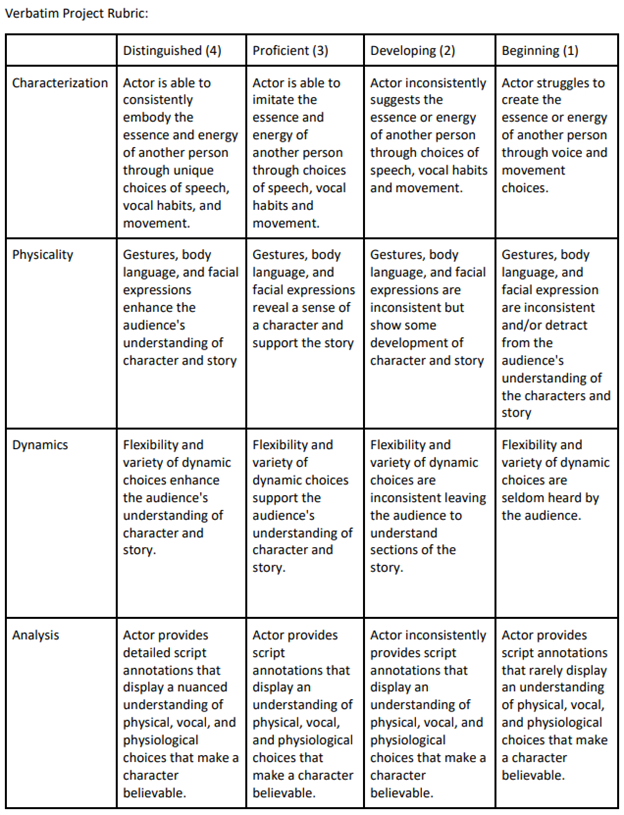
A rubric is included below, or can be downloaded here.
Classroom Connections
This lesson is best suited for High School Proficient. The steps should take 7-15 class sessions.
National Core Theatre Standards:
TH:Cr3.1.I.b. Use research and script analysis to revise physical, vocal, and physiological choices impacting the believability and relevance of a drama/theatre
TH:Pr5.1.I.a. Refine a range of acting skills to build a believable and sustainable drama/theatre performance.
TH:Re9.1.I.c. Formulate a deeper understanding and appreciation of a drama/ theatre work by considering its specific purpose or intended audience.
Become a Member for More
Loving Click to Teach? There are more Click to Teach lessons available for EdTA members! Join today for full access to EdTA's Learning Center!
| Access Date | Quiz Result | Score | Actions |
|---|
Learning Center
- Webinars
- Adjudication Trainings
- Featured Courses
- Full Course List
- Lesson Plan Library
- Click to Teach Interactive Online Lessons
- Resources for New Theatre Teachers
- Technical Theatre Educator's Manual
- Connected Arts Networks
- Diverse Resources for Theatre Education
- Behind the Scenes Technical Theatre Curriculum
- Social & Emotional Learning
- Additional Standards Based Instructional Resources
- Search the Catalog
- Cart (0 items)
Full Site Search
Membership Benefits
Join EdTA for full access to our professional development and standards-based teaching resources, including:
- 300+ lesson plans
- Click to Teach online lessons
- K-12 curriculum
- Webinars
- And more!