
Click to Teach/Click to Learn: Researching and Designing Props
This Click to Teach is based on the lesson "That Bottle Should Have Come with a Label: Props and Script Analysis" by theatre educator Joselyn Ludtke. The full lesson may be found in the Lesson Plan Library. (use the "search this list" function and put "bottle" in the keyword.)
In this unit of instruction, students will learn to design props based on the needs of a script and the application of a design concept. Students will analyze the script and conduct research to make informed decisions on their design. Then, they will generate and refine a design concept and reflect on the design process. This lesson is best suited for High School Advanced level. The steps should take 10-12 class sessions.
Students will be able to:
- articulate and apply original ideas and artistic choices based on script analysis
- integrate technical elements and apply artistic choices to create a design for a drama/theatre work
- revise and refine the expression of artistic choices through the creative process
Step 1: Get Inspired
Watch this video of Adam Savage exploring some of the props from Hamilton with the Props Master of the San Francisco touring production of the show. While watching, reflect on the following questions:
- How do props help to tell a story?
- How does research inform a prop design?
Step 2: Introducing Props Design
For this project, the prop that you will be designing is the apothecary's poison bottle from Romeo & Juliet. You may be thinking "A bottle is just a bottle." Or is it?
Props are defined by their purpose and by the world in which they live. What would the apothecary's poison bottle from Romeo & Juliet look like if it were purchased in a world you created? In this lesson, you will use the script and your world’s characteristics to influence your design. For some examples, check out these designs created by theatre educator Joselyn Ludtke:
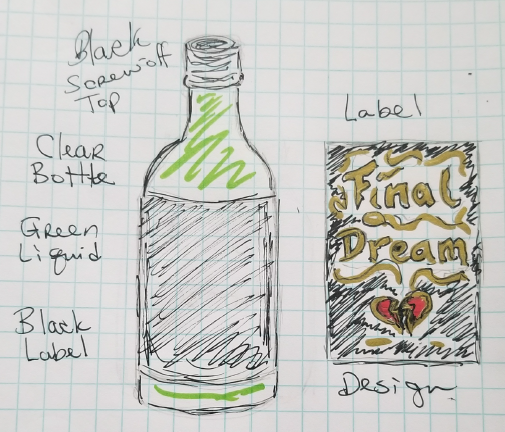
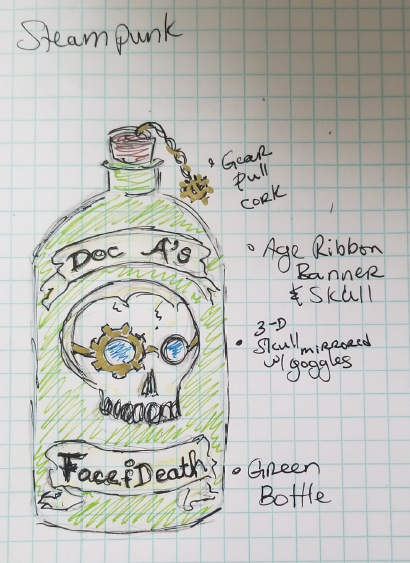
Reflect: What can you tell about these bottles by their appearance? What is the world around them like?
Step 3: Script Analysis
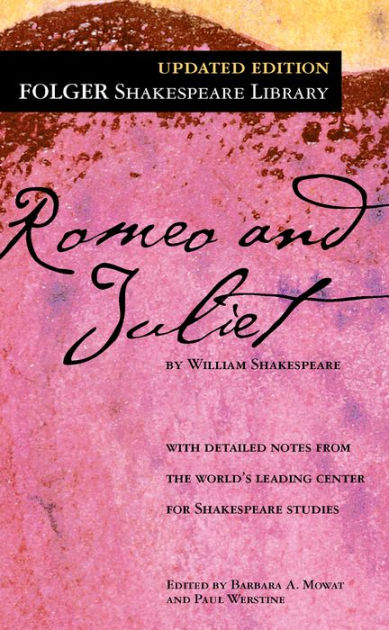
The first step in the design process is to read the show, analyze the script, and conduct any research necessary so that the designer can make informed decisions on their design.
For this project, you will reading and analyzing Romeo and Juliet, Act 5, scene 1. You can find the script in the Folger Shakespeare Library at this link. Use this "Steps to Analysis" document to guide your reading and analysis of the script.
As you read, make a list of descriptions or details from the script that hint at what this prop should do and might look like. Make a few quick sketches/thumbnails and jot down any thoughts you have about your design concept.
You may also access the script as an audio version here.
Or see a translation into plain English here.
Step 4: Design Concept Development
After you have completed your script analysis, it is time to start developing your design concept. For an example, watch this video interview with David Korins, who is the scenic designer for Beetlejuice the Musical on Broadway. He discusses the set design as well as many of the props included in that design. Pay attention to how all of the pieces work together to communicate the overall unifying concept of the show.
Now it's time to decide on the unifying concept and vision of the world that you will be designing in. Use the following two prompts to help you:
- Use the “Magic If” - If you were the character who owned/created this prop, what would it look like? Make a list of what you know about the character that may influence your design. Use details from the script to justify your answers.
- Unifying Concept - What is the overall concept (vision) for the world of the play? How does this prop fit into that world?
Step 5: Inspiration and Research
Based on your script analysis and the design concept you are developing, it's time to do some additional research on the world that you are designing in. What is the time period? What is the mood? Remember - you can be creative about your vision for this world! Research and write notes about how the cultural influence or lens will influence your design. For your final portfolio, you will be asked to make connections between your research and your designs. Be sure to track and cite the sources of your research and inspiration.
Now, find images that inspire you and create a mood/vision board of the world that you are designing within. According to Canva, "A mood board (or inspiration board) is a physical or digital collage of ideas that’s commonly used in fields like interior design, fashion, and graphic design." It can include just about anything — photography, designs or illustrations, color palettes, textures, descriptive words — anything that helps you define the direction of your design project.
This can be created as a physical collage or created digitally (consider using PowerPoint, Canva, or Pinterest). For your mood/vision board, be sure to include the following:
- Images/art work that represent the theme, mood, period, characters and setting of the story.
- Images/art work that evoke the feeling of the characters and places they might exist in the story.
Step 6: Creating Your Design

At this point in the process, you should have some initial thumbnail sketches of some of your ideas. Now, it's time to create the design of your magic bottle.
- Design goals for project: How does the texture, color, label, and accessories used to communicate the bottle reflect the world of the play?
Draw a design for your prop that represents the answer to the question above and builds upon your initial sketches. Use color and notes to communicate your design. In your final portfolio, you will be asked to include sketches of your evolving work. Add notes about your thoughts at the time and notes to what you’re doing well and what you’re struggling with. This is all a part of the design process.
Step 7: Feedback & Revision

As a part of the design process, it is often very helpful to get feedback on your design concept from someone else. When working on a production, this feedback frequently comes from the other members of the production team or from the director. For this project, please show your design sketch to a classmate, friend, or family member, and ask them for feedback using the "TAG Method" - Ask your classmate, friend or family member to address the following three prompts on a sticky note or piece of paper:
T – Tell the artist something you like.
A – Ask the artist a question.
G – Give the artist a suggestion.
As the artist, it is your job to gather the feedback, and reflect on it as it relates to your design. Take time to reflect on any new ideas or potential changes to your design based on this feedback. You don't always need to make changes based on the feedback of others - ultimately it is your design. But it is helpful to hear and consider the perspectives of others to see if your design is communicating what you would like it to.
To prepare for your final reflection, take notes on the feedback you received in your journal and consider whether it influenced any revisions in your design.
Step 8: Artist's Statement
Next, you will be creating an artist's statement justifying your creative choices with support from the script of why you made those choices. You may want to begin by answering the following question: If your bottle could say one sentence, what would it say? TIP: Look back on the work you did in "Step 3: Script Analysis" & "Step 4: Design Concept Development" and connect your final design to your answers to the questions from that work. Additionally, explain the connections between your final design and your research and inspiration images/vision board. Finally, be sure to explain how you responded to the critique and feedback and how it influenced your design.
Step 9: Final Reflection
Reflect on your learning and growth through this design process. Complete a written reflection addressing the following:
- How did you challenge yourself?
- What did you learn?
- What did you do well?
- What would you like to learn next?
Diving Deeper
Want to know more about how professional designers work? Watch the following video to learn about the experiences of two professional props designers.
Measuring Learning
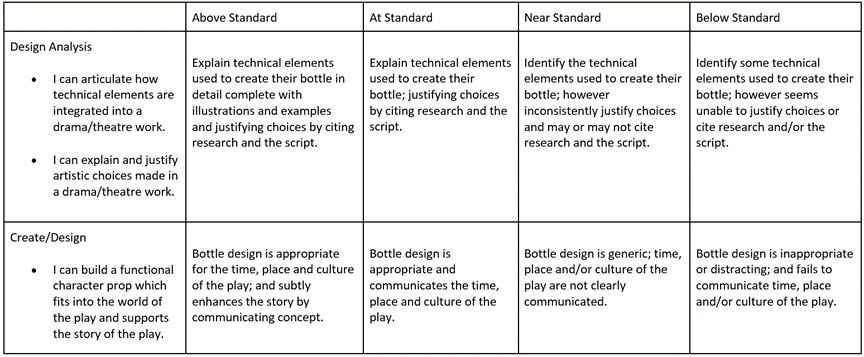
Classroom Connections
This lesson is best suited for High School Advanced. The steps should take 10-12 class sessions.
National Core Theatre Standards:
High School Advanced
TH:Pr5.1.III.b. Explain and justify the selection of technical elements used to build a design that communicates the concept of a drama/theatre production.
TH:Cr1.1.III.a. Synthesize knowledge from a variety of dramatic forms, theatrical conventions and technologies to create the visual composition of a drama/theatre work.
TH:Re8.1.III.a. Use detailed supporting evidence and appropriate criteria to revise personal work and interpret the work of others when participating in or observing a drama/ theatre work
TH:Cn11.2.III.a. Justify the creative choices made in devised or scripted drama/theatre work, based on a critical interpretation of specific data from theatre research.
Become a Member for More
Loving Click to Teach? There are more Click to Teach lessons available for EdTA members! Join today for full access to EdTA's Learning Center!
| Access Date | Quiz Result | Score | Actions |
|---|
Learning Center
- Webinars
- Adjudication Trainings
- Featured Courses
- Full Course List
- Lesson Plan Library
- Click to Teach Interactive Online Lessons
- Resources for New Theatre Teachers
- Technical Theatre Educator's Manual
- Connected Arts Networks
- Diverse Resources for Theatre Education
- Behind the Scenes Technical Theatre Curriculum
- Social & Emotional Learning
- Additional Standards Based Instructional Resources
- Search the Catalog
- Cart (0 items)
Full Site Search
Membership Benefits
Join EdTA for full access to our professional development and standards-based teaching resources, including:
- 300+ lesson plans
- Click to Teach online lessons
- K-12 curriculum
- Webinars
- And more!


