Click to Teach: Creating a Set Design
In this lesson you will be creating a set design concept for the fable, The Ant and the Grasshopper. This lesson may also be adapted for use with any text or script that your class may be working on.
The first thing you need to do is to create a folder which will serve as your portfolio. It will hold your design and any of the materials you use to create the design. Create this folder on your desktop or in an online shared location of your choice. Be sure that everything you place in the folder has your name in the file name. Pause and do that now, then follow the steps in the lesson.
This lesson is based on a lesson plan created by Kristie L. Fuller. View the full and original lesson plan here.
Step 1: Get Inspired
Get into the head of set designer Christopher Dills with his article Read, Render, Realize - A Step by Step Guide to Set Design available on Dramatics.org. Click on the image below to read the article, and then follow the process to create your own set design.
- How can a close reading of a story and text analysis leads to a clear and effective set design
- Why is research important to inspire the creation of a usable set design which enhances and supports the story of the play?
- How can you communicate your design to others?
Step 2: Read and Analyze the Text
Close Reading
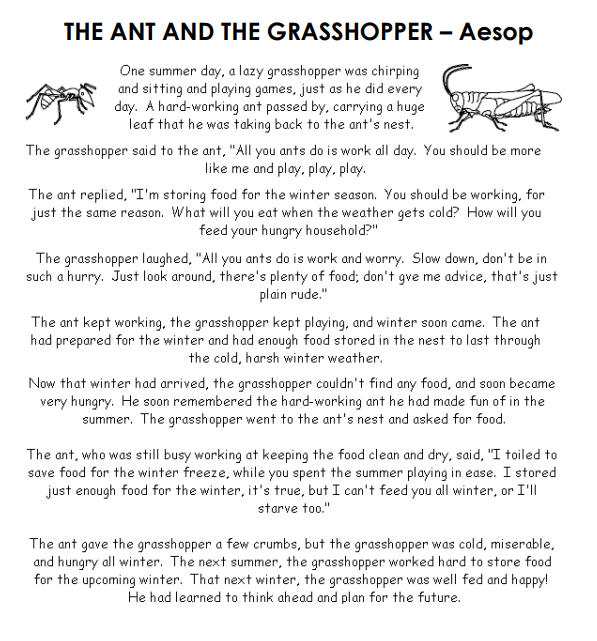
Perform a close reading of your chosen text. The story of The Ant and the Grasshopper is included below. This lesson may be adapted for use with any script your class is currently working on. Another option is to use one of Jon Jory's four-minute play scripts that were written for the EdTA and can be found here.

Text Analysis
After reading through your chosen text a few times, complete a Designer Analysis sheet. If reading The Ant and the Grasshopper, feel free to use the sheet included in the complete lesson plan found here. If reading a different text, use the following questions for guidance. Please include your answers in a document within your portfolio folder.
- What is the theme/moral of the story?
- What are some words you would use to describe the overall mood of the text?
- What are some characteristics of the characters that stand out to you as unique and noteworthy?
- Anything else that's important to note about the world of the play
- Setting:
- What time period/year will you be setting the story in?
- What is the time of day?
- What is the season/climate?
- Staging:
- What type of stage will you be designing for?
- What character exits/entrances will be necessary?
Step 3: Determine Your Concept
Every design begins with a concept, and often this is inspired by an object or image. This imagery provides the foundation for the design. It can be something that is mentioned in the script/story, or it could be something that the designer finds during their research phase that inspires them.
Watch the following video to learn how the Scenic Designer for Wicked based his design on clockwork.
Step 4: Research and Vision Board
For this step, you will research and create a Vision Board to guide your design. "A mood board (or inspiration board) is a physical or digital collage of ideas that’s commonly used in fields like interior design, fashion, and graphic design. It can include just about anything — photography, designs or illustrations, color palettes, textures, descriptive words — anything that helps you define the direction of your project. You will use the creation of this Vision Board to help you choose an image or object which inspires your set design.
| Sample Vision Board |
For your set design vision board, be ready to collect the following:
Images/art work that represent the theme, mood, character and setting of the story.
Images/art work that evoke the feeling of the characters and places they might exist in the story.
Images of possible set pieces which match the time and context of the story (chair, tables, etc.) which you might use for your design.
Pieces of fabric that represent textures which help represent the mood, theme and colors for your design. (OPTIOINAL)
This can be created as a collage or created digitally using the internet. When you are finished, upload your vision board or a picture of your vision board to your digital portfolio folder.
Next, look at your vision board and any objects. images or textures you found to create it. Think back to the video you watched about the design for Wicked, the designer said that clockworks and gears were the inspiration for the design. What object or image speaks to you which might best express your design?
Step 5: Finalize your Concept
Using your Vision Board as inspiration, begin to come up with ideas for your design. Feel free to start small, you don't need to tackle the entire set design at once. It's helpful if you start sketching your ideas for the world you will create - you should complete a rough sketch of any of your ideas. What will your set pieces look like? Will you use a backdrop? How will your set be organized on the stage? Use this as a tool to get your creativity flowing - the more sketches you can make, the better.
According to Scenic Designer Christopher Dills, "Theatre is a visual medium. A scenic designer needs to be able to describe to the creative team what the show might look or feel like. Early in your design work, sketch small, quick drawings of various ideas for the show. These are “thumbnail sketches,” no larger than a few inches across. Each sketch should only take you a few minutes to complete. They do not necessarily relate to each other. Sketch anything that comes to mind and move on to another. Once you have six to eight thumbnails, identify what you like and what you dislike. What helps you and your collaborators to tell the story the best and provides the best opportunity for the director and actors to succeed and connect with the audience?" (quoted from Read, render, realize on dramatics.org)
To further understand the importance of sketching your ideas and how set designers use sketches to communicate, watch this video with David Korins (set designer for Dear Evan Hansen and Hamilton).
Step 6: Communicate your Concept
After you've decided on your set design concept, the next step is creating a representation of it that helps you to communicate your idea to others (for example, the director of the show). In this step, you will create either a 2D colored set rendering or a 3D model of your set design. While creating your rendering or your model, try to keep scale in mind. Decide how big an actor would be, then try to build or draw all your set pieces with that size in mind. Your set design must be usable by actors!
You may choose to draw your set design using colored pencils or markers to create a 2D image (rendering) OR you may choose to build a 3D model of your design. Which ever you choose, take a photo with a cell phone to upload to your digital portfolio.
2D COLORED SET RENDERING
A "set rendering" is another word for a sketch or drawing of the set design that is created with the goal of communicating the design concept to others. So while your rendering doesn't have to be perfect, it should include enough detail to convey your ideas clearly to someone else.
3D MODEL
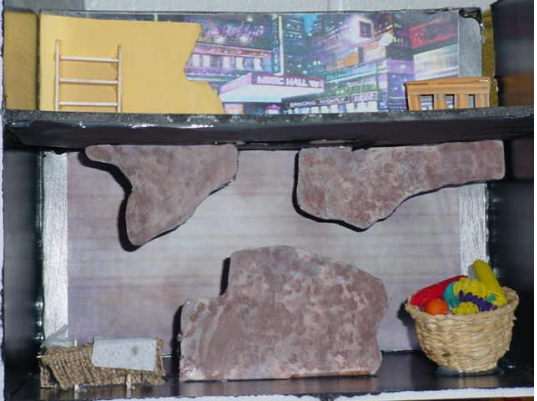
To create a 3D model, make a shadow box version of your set design using paper cut outs or other found objects around your house. For the basis of your model, find a shoe box or another cardboard box. You can create your model either inside or on top of the box. If you are designing for a proscenium stage, you might want to turn the box sideways and use the opening to the box as your proscenium. If you are designing for a thrust or arena stage, you could create your model on top of the box. Feel free to be creative when finding materials that will effectively communicate your ideas to others.
 | Sample 3D Model Set Design "The Ant and the Grasshopper" |
VIRTUAL
Another option for a 3D model is to create one virtually. Your school may have access to a virtual set design tool which you may use, or you can hunt down a home planning tool on the internet to use. If your set model contains furniture or other realistic details, try "Room Styler: 3D Home Planner" to create a design.
After creating your model or rendering - reflect on your work by responding to the following questions:
- How does your design incorporate your understanding of the theme of the play?
- How does your design incorporate your analysis of the characters and setting of the play?
- Which elements of your design were inspired by your Vision Board and other research? What images were particularly inspiring to you?
- When creating your design, how did you consider the usability of it by actors?
- Anything else that you want to highlight on your design
Include your reflection in your digital portfolio folder.
Diving Deeper
Want to know more about set designers work? Watch the following video to learn about the experiences of two professional scenic designers.
Measuring Learning
Classroom Connections
"Creating a Set Design" makes a great lesson to teach in 2-3 class periods. This lesson aligns to the following National Core Theatre Standards and may be used for either Middle Grades or High School. It may also be adapted for use in High School Accomplished or Advanced classes.
Middle Grades
Grade 7
TH:Cr1.1.7.a. Explain and present solutions to design challenges in a drama/theatre work.
TH:Pr5.1.7.b. Choose a variety of technical elements that can be applied to a design in a drama/theatre work.
Grade 8
TH:Cr1.1.8.a. Imagine and explore solutions to design challenges of a performance space in a drama/theatre work.
TH:Pr5.1.8.b. Use a variety of technical elements to create a design for a rehearsal or drama/theatre production.
High School Proficient
TH:Cr1.1.I.a. Apply basic research to construct ideas about the visual composition of a drama/theatre work.
TH:Pr5.1.I.b. Use researched technical elements to increase the impact of design for a drama/theatre production.
| Access Date | Quiz Result | Score | Actions |
|---|
Learning Center
- Webinars
- Adjudication Trainings
- Featured Courses
- Full Course List
- Lesson Plan Library
- Click to Teach Interactive Online Lessons
- Resources for New Theatre Teachers
- Technical Theatre Educator's Manual
- Connected Arts Networks
- Diverse Resources for Theatre Education
- Behind the Scenes Technical Theatre Curriculum
- Social & Emotional Learning
- Additional Standards Based Instructional Resources
- Search the Catalog
- Cart (0 items)
Full Site Search
Membership Benefits
Join EdTA for full access to our professional development and standards-based teaching resources, including:
- 300+ lesson plans
- Click to Teach online lessons
- K-12 curriculum
- Webinars
- And more!


